The KT Tape seems to help. It doesn't make the pain go away completely for me. Then again, I may not have put it on with the right amount of tension Friday. It's hard to say. But, the bright side, I was able to jog, not run, for 30 seconds without sharp stabbing pain. I felt a dull pain though. Again, not sure if this is because of not putting it on correctly or what.
Today, however, I put the KT tape on around 12 and wore it for a few hours before working out at 4pm. I was walking at a pretty good clip without any noticeable pain. Which was nice. I was walking pretty slow last week.
Also, my research to prevent shin splints has lead me to Women's Health's website. I read an article written by Michelle Andrews who prescribed The Toe Tussle. (When I first read the description I had that blank stare..."what???")
Thank goodness for reading it again...here's a breakdown:
Sit in a chair where your legs are making a 90 degree angle with your thighs. Basically, correct posture. Now, tap your toes slowly. I knew I was doing it right when I felt the muscles on my shin doing the work and not my calf muscles.
Here is a link to the article: Toe Tussle
Can you do a 100? I can't...yet!
Hugs,
A.
Monday, October 22, 2012
Saturday, October 20, 2012
DIY Painting a Pumpkin
Soo...I'm still not done decorating for Fall. In my defense, I'm not spending crazy amounts, I'm just being more creative about it than I may have say 3 years ago...
This week, I ran to Walmart with D. and right when you walk in they had a huge pallet of pumpkins for $4. I've really been wanting one. Bad. So I found one with a firm stem and gave it a new home. :)
Carving isn't the best idea with Madeline (the street-smart cat) on the prowl who sniffs out everything. So I figured painting it would be my best option.
Supplies needed:
Pumpkin
Pen
Small paint brush or two
Paints of your choice (I just use the 50¢ bottles from various craft sections found at many stores)

Note: I tried using a pencil on the pumpkin skin but it wasn't wanting to mark. As you can see in the picture I have pencils and black paint- clearly not what I ended up using. In the background is my plastic container full of paints that I ended up using: Dark Chocolate, Hunter Green and Yellow)
Step one:
With a clean pumpkins, draw what you want on the pumpkin to use as a guide or freestyle- whichever you are comfortable with.


This week, I ran to Walmart with D. and right when you walk in they had a huge pallet of pumpkins for $4. I've really been wanting one. Bad. So I found one with a firm stem and gave it a new home. :)
Carving isn't the best idea with Madeline (the street-smart cat) on the prowl who sniffs out everything. So I figured painting it would be my best option.
Supplies needed:
Pumpkin
Pen
Small paint brush or two
Paints of your choice (I just use the 50¢ bottles from various craft sections found at many stores)


Step one:
With a clean pumpkins, draw what you want on the pumpkin to use as a guide or freestyle- whichever you are comfortable with.

Step two:
Start covering what you just drew or wrote with paint. Easy Peasy- no picture required.
Step three:
Enjoy your decorated pumpkin. I added the vine and flower thingy as an after-thought. It made it seem just a little bit better.


Have a good weekend!
Hugs,
A.
Thursday, October 18, 2012
My Workout Diary- First Entry
I'm overweight. Clinically, I'm obese. And I don't like it. I'm mad at myself for letting myself get into this position. But, on the upside, I'm happy that I'm facing this challenge now. I'm going to be turning 29 soon and am not wanting to hit 30 being in this shape. I'm not wanting to be skinny, I want to be healthy and fit. Big difference between those two categories.
The challenge is for me to have a new relationship with my body and food. It's not a healthy lifestyle as it stands right now. Food attempts to satisfy something. What I don't know. I'm not trying to look at this philosophically but instead as a problem that needs to be fixed and I'm looking at it as a step-by step process.
I've been fine tuning this process for about the past month or two and am starting to find my nische. I hope that this diary helps anyone reading. If not, then I understand. I just want to share what works for me and also as a way to keep me motivated. There's nothing like putting your business out there for all to read and just to not follow through with it.
So here we go...
Today was pretty hard. Two reasons.
One, I ran Monday and it felt amazing, even at only a minute a clip, it still felt amazing. I felt as though I was starting to find my groove. Tuesday, I was sore. Wednesday I was limping if I took a wrong step, not totally decrepit limping but it was hurting. I did the ice massage which felt good. Today, I thought I'd try a light jog but immediately had to stop. Shin splints are no joke. I'm mad at myself, aggravated and close to feeling defeated.
Thanks to Google search, I'm hoping this defeated attitude is non existent tomorrow. I read about KT Tape. I've seen it being used by serious athletes and even one lady at work is using it. I figured it's worth a shot.
I'll find out tomorrow. I'm going to hit the gym and see if I can truly do my walk 5 minute/run 1 minute.
The second reason, it's close to that time of the month. I'm wanting to eat everything in site and my body is bloating if I even look at food. I'm cramping and overall just a site to behold.
So two things trying to stop me but I refuse. I'm as stubborn as they come when I want something that's so close within reach.
I sure hope I have better news after tomorrow's workout. My fingers are crossed.
Ash
Sunday, October 14, 2012
Dollar Store Score- DIY Autumn Wreath
The air was actually cooler here in Central Florida! Wow...and the perfect time for me to get to decorating more for fall. I'm slacking big time but the honest truth is that I didn't have any decorations for this time of the year. How horrible is that!?
Well, all of that is changing and I'm doing without hurting my bank account.
This little DIY was used with all items coming from the local Dollar Tree.
Items needed:
One Vine Wreath
Garland of your choosing (I used two 4' sections of Autumn Garland)
Floral Wire
A few foam squash left over from another project (I'll have to show that one too!)

I cut the wire into 4 inch pieces and started out with 10 pieces total. Start by just tying an end to the wreath. Twist a couple of times and leave the ends on. Don't cut them off yet!

Keep tying the garland to the wreath until you have reached your end. Now, start overlapping the garland where the new bundles of leaves are filling up the empty spots on the wreath. Use the wire that is already there in some spots.

Once you are done using the garland to wrap the wreath, there were inevitably some spots that were bare. I used the remaining pieces and wrapped the wire around a few pieces of vine and left an end sticking out. Then just shove the foam pieces onto the wire.

Then..you're done. Hang up and enjoy. This took me all of 20 minutes? If that! And this cost me $4 and change (since I used a few squash from another project.)

Hope this finds you all well!
Hugs,
A.
Monday, October 8, 2012
DIY- Catch-All Bag
Liz Stanley got to me this morning,I saved one of her entries as a favorite a while back. Her blog entry on how to make a boxy makeup bag got me thinking about the tornado in my purse/bag. I have a bag for each little thing which I really don't need and usually rummage around these said bags until I find some random item.
I mean take a look...this is all emergency/dental/warpaint stuff that I haven't yet managed to say no to during the week. Martha Stewart and MacGyver have nothing on me! And the leopard print bag with turquoise trim? How about it has a cat bell...I jingle everywhere! There is no being smooth when you're trying to take your compact out and swear you're going to see a cat rounding the corner.

So thanks to Granny for letting me at her stash and a dainty, unassuming zipper, I created something that will do for now. (To guys, that means more to come- Bwahaha!) I like items that describe me, and this box is pretty much amazingly close to it. You swear you're looking at a boring little zippered box/bag and once you open it- BAM! Color and craziness galore. I love it! *Squeal*


Now, for a few pointers on Liz's instructions..
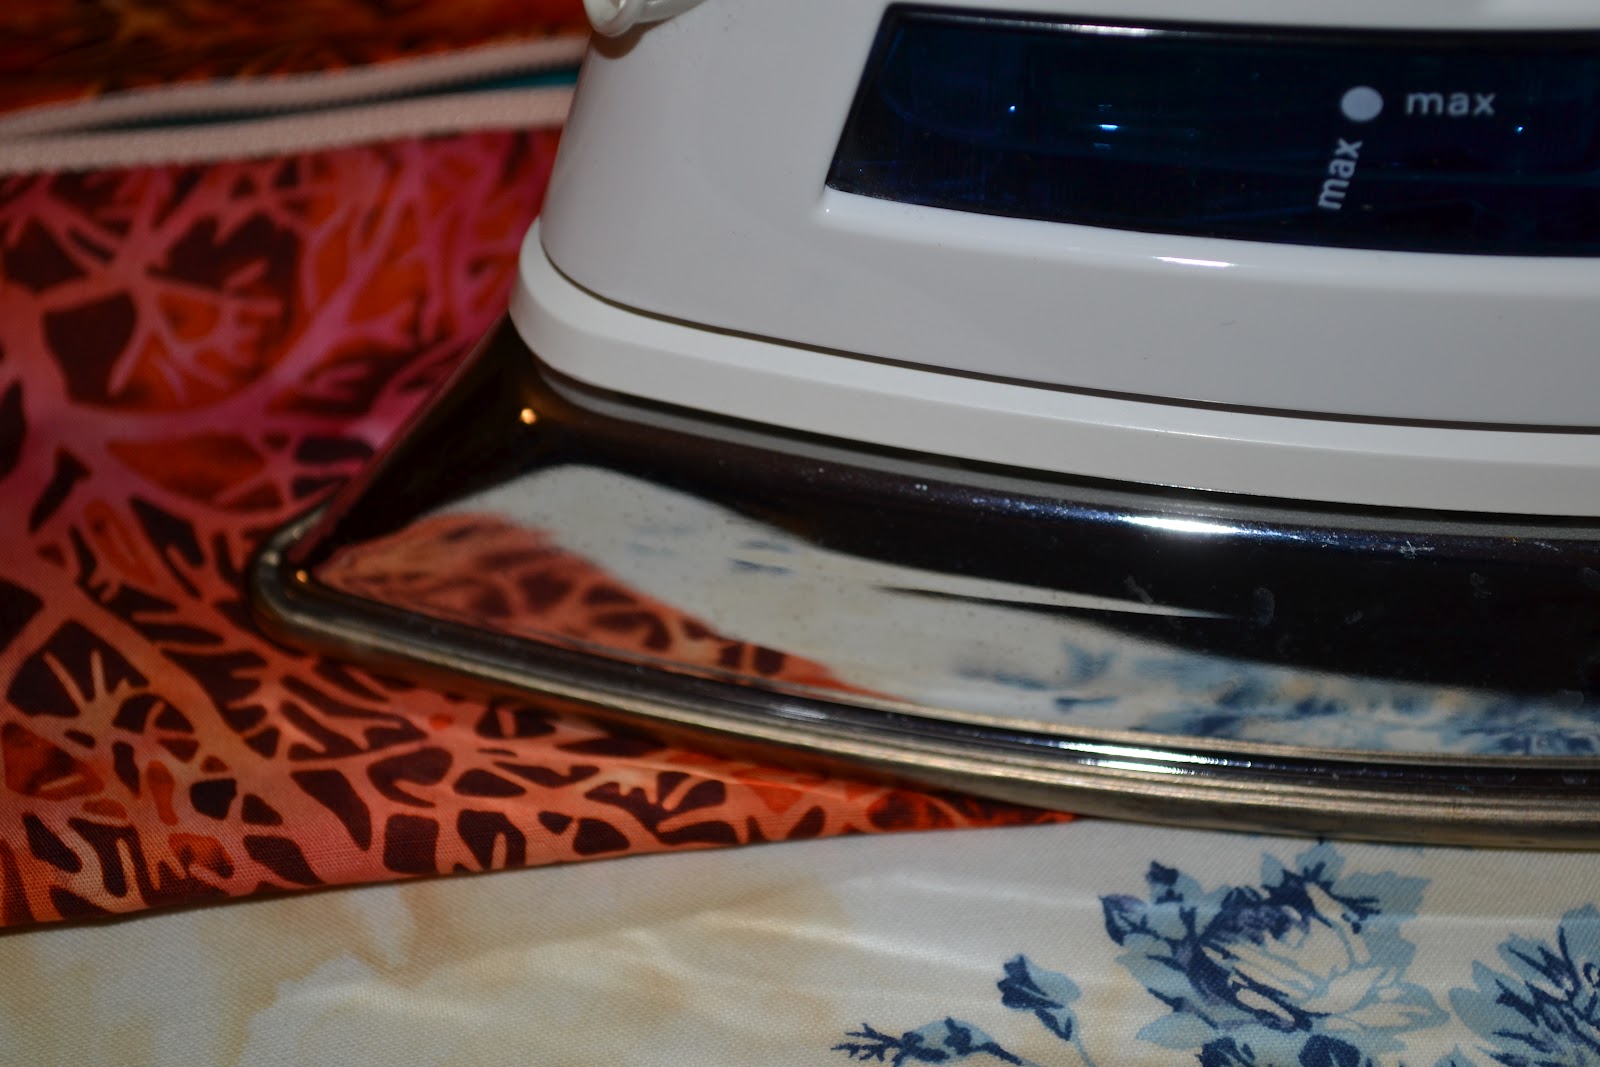
When you are constructing the box, I like to go over the seam 3 times. I don't know how I do it but I manage to man-handle it and next thing I know- hole. Ugh...So for me, I have to protect it from myself.

I also add a zig-zag stitch...I don't own a serger and for some odd reason, my brain is telling me this is going to help even more. Just humor me..

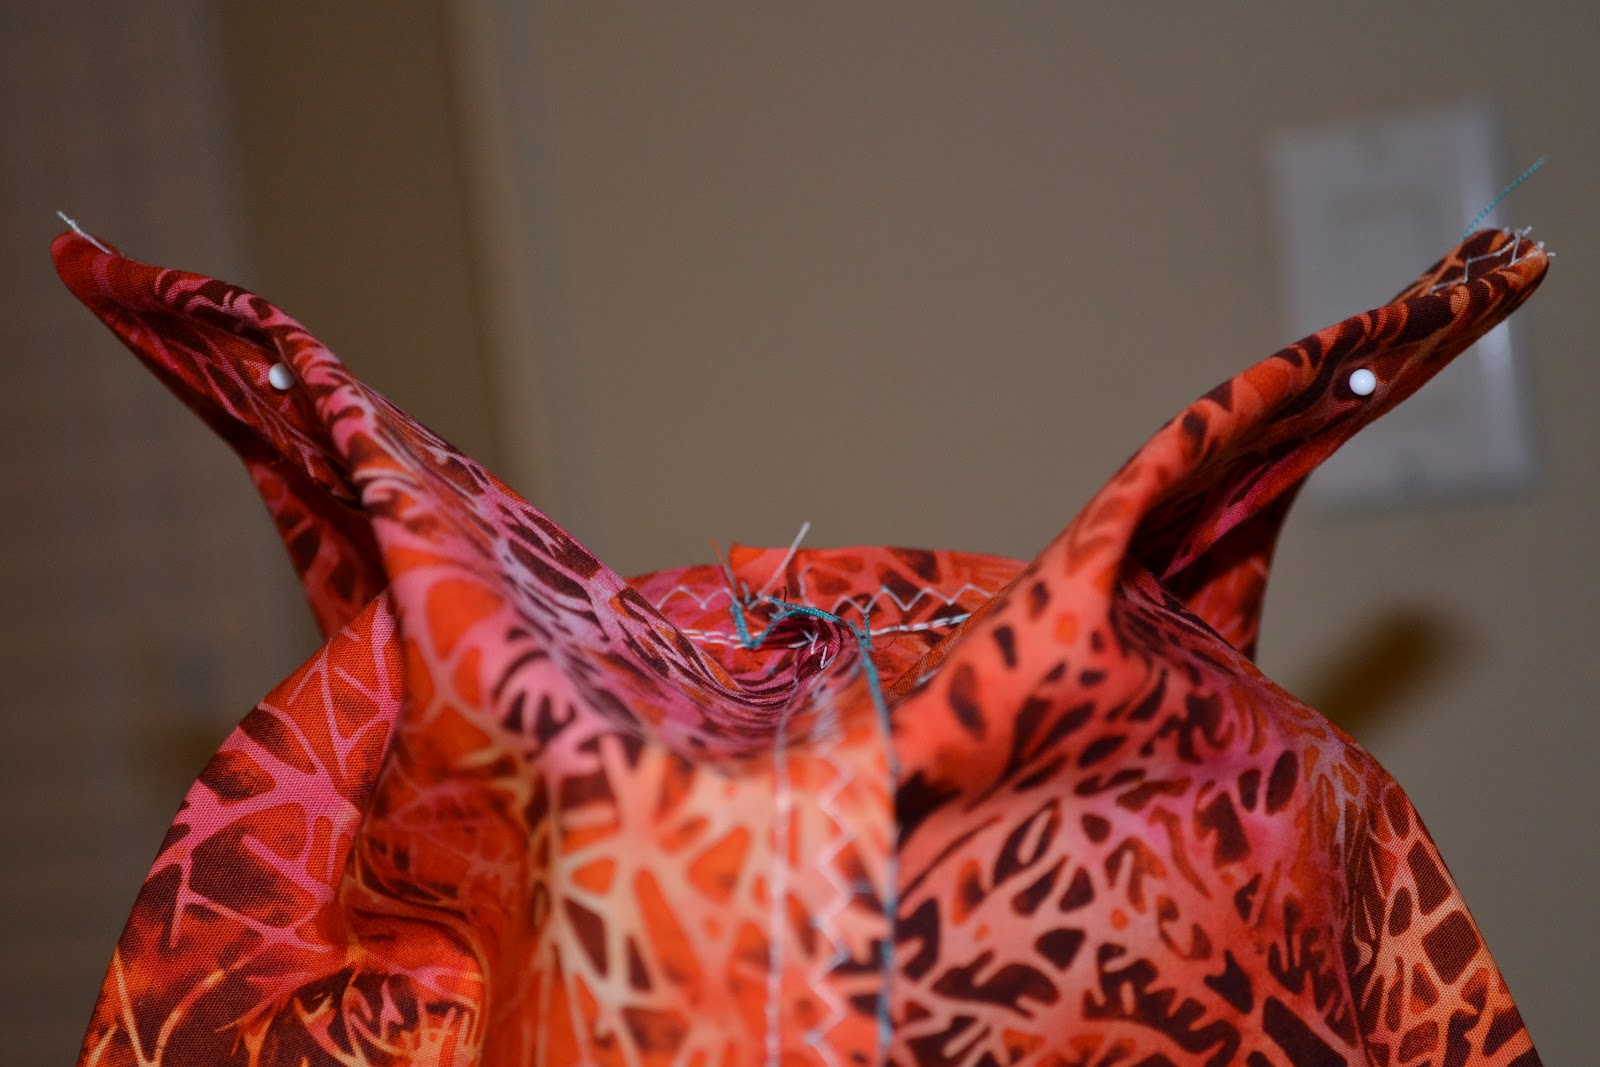
Now, onto the 4 points. I press the seam down and then insert a pin right along that seam. This allows me to match up the pressed seam to the sewn seam so much easier. you can feel when you have the two right on top of each other.


And if you did it right, you get owl ears... this is how I know I got it spot on, weird but it works!

I measure each line as close as I can to match the others. Again sewing 3 times and then snipping off at roughly 1/4" hem.

So much better, now all of this is in one bag and I'll be fine digging through just that.
 And just because he was being cute while watching me work, I had to get this quick picture of Geoffrey. I'm not sure if this is boredom, contentment or just wanting attention away from this bag. Or maybe he's loving life and is showing how comfy he is. Well, it worked, he's such a cute little string bean. Love him to bits!

Hugs,
A.
I mean take a look...this is all emergency/dental/warpaint stuff that I haven't yet managed to say no to during the week. Martha Stewart and MacGyver have nothing on me! And the leopard print bag with turquoise trim? How about it has a cat bell...I jingle everywhere! There is no being smooth when you're trying to take your compact out and swear you're going to see a cat rounding the corner.

So thanks to Granny for letting me at her stash and a dainty, unassuming zipper, I created something that will do for now. (To guys, that means more to come- Bwahaha!) I like items that describe me, and this box is pretty much amazingly close to it. You swear you're looking at a boring little zippered box/bag and once you open it- BAM! Color and craziness galore. I love it! *Squeal*


Now, for a few pointers on Liz's instructions..
When you are constructing the box, I like to go over the seam 3 times. I don't know how I do it but I manage to man-handle it and next thing I know- hole. Ugh...So for me, I have to protect it from myself.

I also add a zig-zag stitch...I don't own a serger and for some odd reason, my brain is telling me this is going to help even more. Just humor me..

Now, onto the 4 points. I press the seam down and then insert a pin right along that seam. This allows me to match up the pressed seam to the sewn seam so much easier. you can feel when you have the two right on top of each other.

And if you did it right, you get owl ears... this is how I know I got it spot on, weird but it works!
I measure each line as close as I can to match the others. Again sewing 3 times and then snipping off at roughly 1/4" hem.

So much better, now all of this is in one bag and I'll be fine digging through just that.


Hugs,
A.
Sunday, October 7, 2012
Spr-er Fall Cleaning Day for Me!
I'm finally getting some things organized and cleaned, and I'm not waiting until Spring.
Life can get crazy but after awhile I get tired of the clutter and go on an organizing kick. It doesn't take me time, just one day and all is better. I even pulled together items that I need to work on and share with everyone. I promise- more will come!
I even found a few things that need to go to work or to be given away. Donating back to the places that give me amazing things and also food (yes, the pantry had it's fair share of attention today also) to donate to the local organizations will benefit, even friends! Win-win all the way around.
I guess the reason I like to do this is to get ready for the Holiday Season. There is no reason to allow clutter to take up unnecessary space and to cloud what I want to focus on- which is the feel-good spirit that always happens right before Halloween.
Here's proof of my organizing: Space Bags! I was so tired of the Spring/Summer clothes being in my way- so voila to instant room in my closet and drawers. All that is left to buy is a Hanging Space Bag and I will be finished. Woo Hoo!

Here is a gathering of some of the tutorials that I'm going to share soon. Let's see, there are one, two...NINE projects in just this one picture. (Hmm...no more buying until these are finished!)

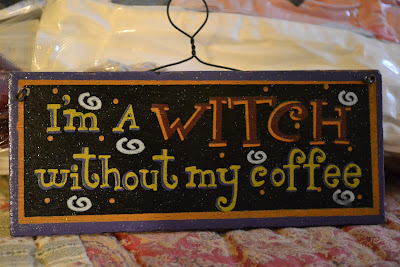
And here is a little gem that will have to hang on my cube wall at work! Too cute and perfectly fitting for this month. *squeal* I love it! ..which reminds me, why isn't there something similar to this for the rest of the year and/or holidays.
Now I'm off to make another Pumpkin Loaf- D. is so excited, he can't wait! :) Oh, and a quick trip to Hallmark- don't want that free $2 certificate to go to waste!
Hugs,
A.
Life can get crazy but after awhile I get tired of the clutter and go on an organizing kick. It doesn't take me time, just one day and all is better. I even pulled together items that I need to work on and share with everyone. I promise- more will come!
I even found a few things that need to go to work or to be given away. Donating back to the places that give me amazing things and also food (yes, the pantry had it's fair share of attention today also) to donate to the local organizations will benefit, even friends! Win-win all the way around.
I guess the reason I like to do this is to get ready for the Holiday Season. There is no reason to allow clutter to take up unnecessary space and to cloud what I want to focus on- which is the feel-good spirit that always happens right before Halloween.
Here's proof of my organizing: Space Bags! I was so tired of the Spring/Summer clothes being in my way- so voila to instant room in my closet and drawers. All that is left to buy is a Hanging Space Bag and I will be finished. Woo Hoo!

Here is a gathering of some of the tutorials that I'm going to share soon. Let's see, there are one, two...NINE projects in just this one picture. (Hmm...no more buying until these are finished!)

And here is a little gem that will have to hang on my cube wall at work! Too cute and perfectly fitting for this month. *squeal* I love it! ..which reminds me, why isn't there something similar to this for the rest of the year and/or holidays.

Now I'm off to make another Pumpkin Loaf- D. is so excited, he can't wait! :) Oh, and a quick trip to Hallmark- don't want that free $2 certificate to go to waste!
Hugs,
A.
Wednesday, October 3, 2012
Secrets to Thrifting
Thrift stores used to have a connotation (to me, that is) that they carried nothing but the dregs of clothes and furniture that no one wanted anymore. But, due to a desire for more clothes without any extra money coming in, I found myself willing to take the plunge.
For all of you out there finding yourself in any “unforeseen circumstances” or absolutely love a great deal- here are a few suggestions from me that I hope help you out, even if just a little.
1. I started out by going in with my nose turned up- but I willed myself to just look. Nix the worry about someone seeing you in there that you don’t want to see you. Besides, they’re in there for a reason too, they aren’t in there scoping out who has to shop at those places. They are there for themselves.
2. I started buying stuff not to go on my body but for the house. I’ve always tried to repurpose items I already have but sometimes you run out of stuff to repurpose! I’ve found lamps and picture frames so far (more to come on that later) that have turned out really well. These small steps got me hooked.
3. Take note: there are okay thrift stores and there are better ones. Trust me on this. My local Goodwill is great for furniture but that’s it. I’ll still browse the clothes and the occasional gym will pop out but for the most part- I stick to the back of the store. On that note, the Salvation Army is my friend. I mean best friend for clothes. I think it’s because of how they organize the clothes and are sectioned by color. I actually go to another county that is by a nice section of town and have found clothes in amazing and brand new (tags still attached) condition.
4. Some Goodwill, Salvation Army and/or thrift stores have some days with special offers. Since I’m a Salvation Addict, I can explain how they work better. Every day they offer 50% off on a certain tag color and every Wednesday they have 50% off the entire store.
 |
| Very nice brands and the clothes are in AMAZING condition! Just take half off those tags, and that's what I spent. |
5. Check all clothing of holes, rips or tears before buying. Some things can be fixed, but if the cost of repair is exceeding what you would realistically spend if it were new- skip it. It’s not worth the hassle. Sometimes the gamble pays off- I’ve removed paint from a shirt with Acetone and immediately washed it- like new! Win-win.
Hugs,
A.
P.S. I went today (I typed this up this past weekend initially, but the Pumpkin Walnut bread won) since it was “½ Off Day” and actually heard an older lady on her cell phone telling the listener that she saw So-and-So there and as soon as So-and-So saw her, she high-tailed it out of there. This lady thinks she skedaddled because of where she was and didn’t want anyone seeing her there.
This story just proved my point- everyone is there for their own reasons! This lady on her phone was checking out entire racks- she was shopping!
And for the record- I bought 8 tops for myself and D. for $16.42- SCORE!
Monday, October 1, 2012
Pumpkin Walnut Loaf
It's October 1st, and to me that signals Fall. I'm already thinking about the warm colors that are popping up in my wardrobe and just dying to feel a chill in the air. Pumpkins, hot tea, baking with cinnamon and pumpkin and all of those savory ingredients makes me yearn for that cool breeze. Even the hints of smell in the air that tells me cooler weather is ahead just makes me giddy.
Being a Florida native and never having truly experienced Fall (no raking here!) makes me even more wistful- even more determined to seeing the changes. I even get excited about seeing pumpkins in the stores- it just makes me so happy.
So for me to celebrate, (and to use up some walnuts that have been around for the past couple of weeks) I decided to make a Pumpkin Walnut Loaf. Yes, it is Monday- but it's the 1st!!! I've never celebrated like this before but baking makes me want to make this a tradition. (That's the old-soul in me, I love traditions!)
I searched high and low for a recipe and finally settled on one and made only minor changes since I didn't have every ingredient listed.
Here is the link to Caren Blair's website. She's a bonafied baker! And on that note, I can say- I'm not. I just want to eat stuff that's good for me and I wont feel guilty. (I hate feelin' guilty!)
This is my version:
Caren Blair's Pumpkin Walnut Loaf
1/2 cup butter softened
1 1/2 cups sugar
2 eggs
1/2 teaspoon vanilla
1/4 cup water
1 cup pumpkin puree
1 1/3 cups rice flour
1 teaspoon baking soda
1/2 teaspoon baking powder
1/4 teaspoon salt
1/2 teaspoon cinnamon
1/4 teaspoon ground nutmeg
1/4 teaspoon ground ginger
1/2 cup chopped walnuts
Directions
Preheat oven to 350F. Butter and flour 1 regular loaf pan. In a mixer, cream softened butter and sugar. In another bowl whisk eggs, vanilla, water, and pumpkin until smooth. Slowly add pumpkin mixture to butter & sugar and beat until fully mixed. In another bowl, mix all dry ingredients together. Add dry ingredients to wet in three separate additions until just combined, but before adding the third portion, mix nuts in before adding. Pour mixture into pan and bake for 30-45 minutes or until toothpick inserted comes out clean. Fully cool in pan. (and feel free to a muffin or two so you can enjoy a lot sooner!)
Follow the directions exactly as she states (yes, I did change it to fit my Southern Style just a teensy bit) and voila- smell good home and a warm, happy tummy.
I had to make 2 muffins so that I didn't have to wait so long for a cool down period before trying it. And I had to have a cup of tea with it! ...Oh my word...absolute deliciousness with a spoon full of love mixed in. I'm hooked and so is D, we both sat down and enjoyed/critiqued this together. This will be a repeat.

Hugs,
A.
Subscribe to:
Posts (Atom)